GoGuardian
Last Updated:
October 20th, 2022
GoGuardian is a classroom management solution that gives teachers the ability to:
- eliminate potential distractions
- monitor student actions on devices
- connect with students and parents
This is the tool you wish you had yesterday. But now that you have it, let's make sure you know how to make the most of it.
Creating Classes
Do Not Import from Google Classroom
Despite the tempting option to import classes from Google Classroom, you do not want to use this button. But why not? Thanks to our integration with ClassLink, your classroom rosters in Genesis sync with ClassLink, and ClassLink tells GoGuardian who should be in your class.
Let ClassLink Do the Work For You
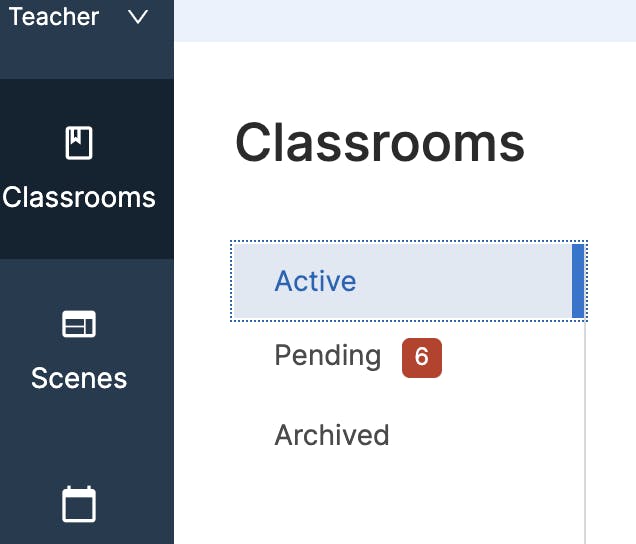
So the moral of the story is, you should not need to ever create a classroom in GoGuardian. What you will have to do is accept the classes GoGuardian will make for you. For every course that you teach, you will find a corresponding class in GoGuardian waiting for you to accept it. After you agree to the GoGuardian terms and conditions, you will be taken to you dashboard. There you will see pending classes with a red number next to it.
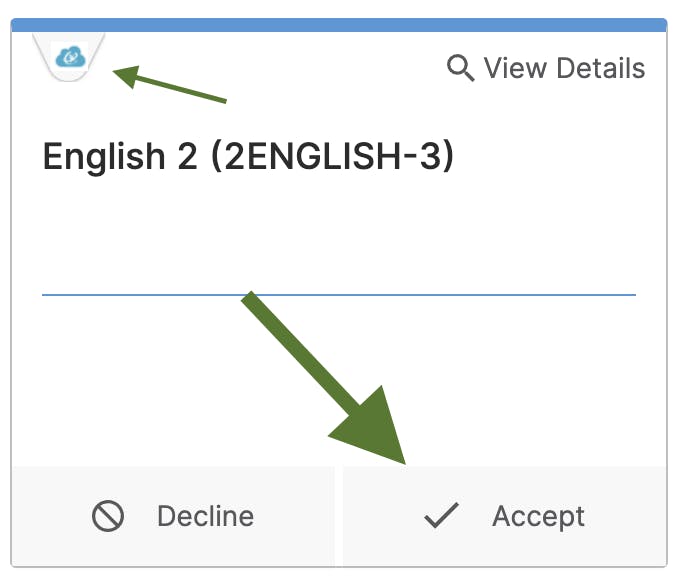
Click on Pending and you will see a list of all your courses. Depending on the level you teach, you may only need to accept 1 of these classes. Below you will see what each course "card" will look like. Besides the Accept button, please note the small ClassLink icon in the top left. This indicates that you are looking at a class whose roster will be synced daily to match your Genesis roster.
Accept Your Class(es)
At this point, you can view the class details to see the list of students in the course and/or accept the class(es) you wish to use this school year. And you're ready for the next step...
Let's Make a Scene!
We know how much you are looking forward to monitoring your students as they complete their learning tasks, but we promise you that if you take the time to make a scene (or several) first, you experience during monitoring will be much better.
How Do you Make a Scene?
This video should give you a clear path to making the 2 different kinds of scenes GoGuardian makes available to you. If you find written instructions to be more useful, checkout the help documentation from GoGuardian.
When making scenes, it is important to consider the tasks in which your students will be engaged. If you break your lessons down into "chunks," like do-nows, or assessments, independent reading/writing, consider making scenes specifically for these chunks of time to keep students focused on the learning task.
Apply the Scene
Now that you put the leg work into your scenes, it's important to note that they won't do you any good if you don't apply them. As seen in the video above, you must apply scenes for them to take effect. Fortunately, you can apply scenes to 1 or more students (even the whole class by default). So if you applied a scene during an assessment, and you want to apply a different scene when they are finished, you can do that with GoGuardian scenes.
Start the Session, Take Command
You made it! It's time to finally have an eye on each students' screen all from your teacher workstation. From your classroom dashboard, choose a session duration that matches the time you will be with your students. You may then click Start Session. See below:

You will then see your Screens view of your class session. Each card (or tile if you prefer) will provide you with information about what the student is doing on their device. Most notably, you will see a thumbnail representation of what is currently on their screen. At the bottom, you will see icons (favicon to be specific) for each tab they have open. Using this screens tab, you can begin to issue Teacher Commands.
How to Take Command
There are several actions you can take with students and GoGuardian has a great video to show you how to do that:
Here is a list of commands and links to how to execute them:
Keep an Eye on the Timeline
GoGuardian recommends that if you are moving about the classroom, leave the timeline view projected so you can see at a glance the actions of your students. A benefit to the timeline view is that it is saved as part of the class session data. It will tell you the time spent and on which site(s). Here's GoGuardian's thoughts on the timeline view:
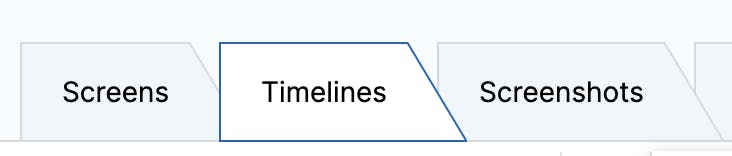
Switching between views while monitoring class activity is done by clicking on the tabs (seen below):
Be Sure to End Your Sessions
Before your students leave your classroom, please be sure to end your class session. This is critically important in schools where students have more than one teacher. If your students move to their next class while your session is still active, they will end up having your class rules and the next teacher's rules as well. For this reason, ending sessions or better yet, scheduling sessions should be completed with fidelity.
How to Schedule Your Session Times
For a bit of an "advanced" lesson, check out this help article from GoGuardian on how to schedule the start and stop times for your classroom sessions.
Troubleshooting GoGuardian
In the event that things start acting strangely, knowing where to go to find help quickly is important. Of course as your EdTech specialists, we hope that you will reach out to us if you need us. However, we know that sometimes a quick search can reveal the solution. To this end, we recommend seeing this help page for troubleshooting GoGuardian as problems arise.
Remember, you can always reach us here.
Did You Complete a PLC Training with Lois or Neil?
Get your certificate by completing this form (scan with your mobile phone):